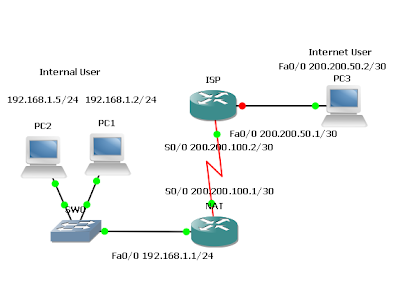
Routers Used: 2621 w/ CISCO2600-MB-2FE and WIC-2T modules
IOS: c2600-i-mz.121-5.T9
Objective
- In this lab, Port Address Translation (PAT) and port forwarding are configured.
- The International Travel Agency is planning to launch an informational Web site on a local Webserver for the general public. However, the one Class C address that has been allocated will not be sufficient for the users and devices the company has on this network. Therefore, a network is configured that will allow all internal company users access to the Internet and all Internet users access to the company’s informational Web server through static NAT and PAT. Internal user addresses must be translated to one legal global address and all Internet Users must access the informational Web server through the one legal global address as well.
- Build and configure the network according to the diagram. If you are using the configuration files from the previous lab, remove the NAT pool (public) and the static and dynamic NAT configurations. Use a Cisco router as WebServer if another Web server is not available.
- Use ping to test connectivity between the NAT and ISP routers, between the Internal User and the NAT router, and between the Internet User and ISP.
- Also check that WebServer server is accessible by connecting to it from the Internal User
workstation with a browser using the WebServer IP address, 192.168.1.5.
- Since no routing protocol will be enabled, configure a default route to the Internet from the NAT router.
NAT(config)#ip route 0.0.0.0 0.0.0.0 200.200.100.2
- Create a standard Access Control List that would enable all Internal Users access to the Internet.
NAT(config)#access-list 1 permit 192.168.1.0 0.0.0.255
- Because a single inside global address, 200,200.100.1, will be used to represent multiple inside local addresses, 192.168.1.x, simultaneously, apply the access list and configure NAT overload on the serial 0/0 interface of the NAT router. In general, NAT can used to overload a pool of public addresses, when a single external address is overloaded. This is referred to as port address translation (PAT).
NAT(config)#ip nat inside source list 1 interface s0/0 overload - This configuration allows Internal Users to access the Internet, but blocks external users from accessing internal hosts.
- Now specify the inside and outside NAT interfaces.
NAT(config)#interface fastethernet 0/0
NAT(config-if)#ip nat inside

NAT(config-if)#interface serial 0/0
NAT(config-if)#ip nat outside
- Enter the command ping 200.200.50.2 from the Internal User workstation. Then, on the NAT router, enter the commands show ip nat translations, show ip nat statistics, and show ip nat translations verbose. Sample output follows.
NAT#sh ip nat translations
Pro Inside global      Inside local       Outside local      Outside global
icmp 200.200.100.1:27057 192.168.1.2:27057 200.200.50.2:27057 200.200.50.2:27057
icmp 200.200.100.1:26033 192.168.1.5:26033 200.200.50.2:26033 200.200.50.2:26033
icmp 200.200.100.1:27313 192.168.1.2:27313 200.200.50.2:27313 200.200.50.2:27313
icmp 200.200.100.1:26289 192.168.1.5:26289 200.200.50.2:26289 200.200.50.2:26289

NAT#show ip nat statistics
Total active translations: 4 (0 static, 4 dynamic; 4 extended)
Outside interfaces:
Serial0/0
Inside interfaces:
FastEthernet0/0
Hits: 85  Misses: 18
Expired translations: 10
Dynamic mappings:
-- Inside Source
access-list 1 interface Serial0/0 refcount 4

NAT#show ip nat translations verbose
Pro Inside global      Inside local       Outside local      Outside global
icmp 200.200.100.1:27057 192.168.1.2:27057 200.200.50.2:27057 200.200.50.2:2705
create 00:00:45, use 00:00:45, left 00:00:14,
flags:
extended, use_count: 0
icmp 200.200.100.1:26033 192.168.1.5:26033 200.200.50.2:26033 200.200.50.2:2603
create 00:00:49, use 00:00:49, left 00:00:10,
flags:
extended, use_count: 0
icmp 200.200.100.1:27313 192.168.1.2:27313 200.200.50.2:27313 200.200.50.2:2731
create 00:00:45, use 00:00:44, left 00:00:15,
flags:
extended, use_count: 0
icmp 200.200.100.1:26289 192.168.1.5:26289 200.200.50.2:26289 200.200.50.2:2628
create 00:00:49, use 00:00:48, left 00:00:11,
flags:
extended, use_count: 0
- Internet users need access to the informational Web server through 200.200.100.1 through port 80. Configure PAT so that Internet users are directed to the informational Web server, 192.168.1.5, when they connect to the IP address 200.200.100.1 through a web browser.
NAT(config)#ip nat inside source static tcp 192.168.1.5 80 200.200.100.1 80
extendable - The extendable keyword at the end of this static NAT command causes the router to reuse the global address of an active translation and save enough information to distinguish it from another translation entry. This command has the effect of translating external attempts to connect to port 80/IP address 200.200.100.1 to internal attempts to connect to port 80/IP address 192.168.1.5. The process of performing NAT translations based on the value of the incoming port number of an IP packet is called port forwarding.
- Successful configuration of port forwarding is indicated by being able to reach the informational Web server from the Internet User workstation with a Web browser using the inside global address of 200.200.100.1.
Network Address Translation – Port Address Translation and Port Forwarding
Comments
Post a Comment