Oracle 11g installation on RHEL 5.
Oracle 11g requires at least 1GB RAM
Oracle 11g requires at least 1GB RAM
#grep MemTotal /proc/meminfo
MemTotal: 1027144 kb
#grep SwapTotal /proc/meminfo
SwapTotal: 1052216 Kb
- We need at least 400MB free space in /tmp
- About 3.5GB free space for Oracle software
- The kernel for Red Hat 5 should be 2.6.18 or newer
2.6.18-53.el5
1. Install some packages:
1. Install some packages:
[root@chetan~]#yum -y install binutils compat-libstdc++-33 elfutils-libelf elfutils-libelf-devel
glibc glibc-common glibc-devel gcc gcc-c++ libaio libaio-devel libgcc libstdc++ libstdc++-devel
make sysstat unixODBC unixODBC-devel 2. Edit Kernel Parameter.
[root@chetan~]# vim /etc/sysctl.conf
[root@chetan~]# vim /etc/sysctl.conf
# make it comment
#net.bridge.bridge-nf-call-ip6tables = 0
#net.bridge.bridge-nf-call-iptables = 0
#net.bridge.bridge-nf-call-arptables = 0
# add at the last line
net.ipv4.ip_local_port_range = 9000 65500
fs.file-max = 6815744
kernel.shmall = 10523004
kernel.shmmax = 6465333657
kernel.shmmni = 4096
kernel.sem = 250 32000 100 128
net.core.rmem_default=262144
net.core.wmem_default=262144
net.core.rmem_max=4194304
net.core.wmem_max=1048576
fs.aio-max-nr = 1048576
fs.file-max = 6815744
kernel.shmall = 10523004
kernel.shmmax = 6465333657
kernel.shmmni = 4096
kernel.sem = 250 32000 100 128
net.core.rmem_default=262144
net.core.wmem_default=262144
net.core.rmem_max=4194304
net.core.wmem_max=1048576
fs.aio-max-nr = 1048576
[root@chetan~]# sysctl –p
net.ipv4.ip_local_port_range = 9000 65500
fs.file-max = 6815744
kernel.shmall = 10523004
kernel.shmmax = 6465333657
kernel.shmmni = 4096
kernel.sem = 250 32000 100 128
net.core.rmem_default=262144
net.core.wmem_default=262144
net.core.rmem_max=4194304
net.core.wmem_max=1048576
fs.aio-max-nr = 1048576
fs.file-max = 6815744
kernel.shmall = 10523004
kernel.shmmax = 6465333657
kernel.shmmni = 4096
kernel.sem = 250 32000 100 128
net.core.rmem_default=262144
net.core.wmem_default=262144
net.core.rmem_max=4194304
net.core.wmem_max=1048576
fs.aio-max-nr = 1048576
3. Create a user for oracle.
[root@chetan ~]# groupadd -g 201 dba
[root@chetan ~]# useradd -u 440 -g oinstall -G dba -d /usr/oracle oracle
[root@chetan ~]# useradd -u 440 -g oinstall -G dba -d /usr/oracle oracle
[root@chetan ~]# vi /etc/pam.d/login
#add at the last line
session required pam_limits.so
[root@chetan ~]# vim /etc/security/limit.conf
# add at the last line
oracle soft nproc 2047
oracle hard nproc 16384
oracle soft nofile 1024
oracle hard nofile 65536
oracle hard nproc 16384
oracle soft nofile 1024
oracle hard nofile 65536
[root@chetan ~]# vim /etc/profile
# add at the last line
if [ $USER = "oracle" ]; then
if [ $SHELL = "/bin/ksh" ]; then
ulimit -p 16384
ulimit -n 65536
else
ulimit -u 16384 -n 65536
fi
fi
if [ $SHELL = "/bin/ksh" ]; then
ulimit -p 16384
ulimit -n 65536
else
ulimit -u 16384 -n 65536
fi
fi
4. Note: Access control does not allow opening X-windows from any server.
We will use xhost command to disable this access control.
We will use xhost command to disable this access control.
[root@chetan~]# xhost
Access control enabled,only authorized clients can connect
[root@chetan~]# xhost +
Access control disabled, clients can connect from any host
5. Switch to a user “oracle” and configure some settings.
[oracle@chetan ~]$ chmod 755 /usr/oracle
[oracle@chetan ~]$ mkdir /usr/oracle/app
[oracle@chetan ~]$ chmod 775 /usr/oracle/app
[oracle@chetan ~]$ mkdir /usr/oracle/oradata
[oracle@chetan ~]$ chmod 775 /usr/oracle/oradata
[oracle@chetan ~]$ mkdir /usr/oracle/app
[oracle@chetan ~]$ chmod 775 /usr/oracle/app
[oracle@chetan ~]$ mkdir /usr/oracle/oradata
[oracle@chetan ~]$ chmod 775 /usr/oracle/oradata
[oracle@chetan ~]$ vi ~/.bash_profile
umask 022
export ORACLE_BASE=/usr/oracle/app
[oracle@chetan ~]$ mkdir tmp # create a temporary dir to installation purpose
[oracle@chetan ~]$ cd tmp
[oracle@chetan tmp~]$ unzip linux_11gR2_database_1of2.zip
[oracle@chetan tmp~]$ unzip linux_11gR2_database_2of2.zip
[oracle@chetan tmp~]$ cd database
[oracle@chetan database ~]$ ./runInstaller
1.Oracle Installer starts like follows.


2.Select "Install database software only".

3. For this example, select "Single Instance ***".

4. Select your language.

5. Select which edition you install.

6. Specify base directory and files for Oracle. On this example, keep default and Proceed.

7. Specify directory for installation. On this example, keep default and Proceed.

8.Specify priviledged group. On this example, keep default and Proceed.

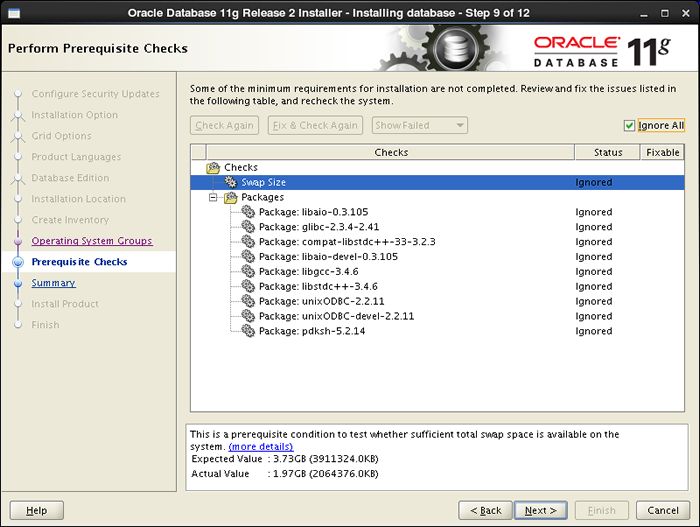
9. Checking settings runs automatically for requirements of installing Oracle. Generally, some packages requirements failed like follows, but it's noplobmen because most of them are higher version packages than requirements. Ignore them if the result is the same to the follows.
10.The summary is shown for configuration. Click "Finish" if it's OK all.

11. Installation starts.

12. Following screen is shown, then open a terminal and execute follwong commands by root user.

[root@chetan ~]#/usr/oracle/oraInventory/orainstRoot.sh
Changing permissions of /usr/oracle/oraInventory.
Adding read,write permissions for group.
Removing read,write,execute permissions for world.
Adding read,write permissions for group.
Removing read,write,execute permissions for world.
Changing groupname of /usr/oracle/oraInventory to oinstall.
The execution of the script is complete.
The execution of the script is complete.
[root@chetan ~]# /usr/oracle/app/product/11.2.0/dbhome_1/root.sh
Running Oracle 11g root.sh script...
The following environment variables are set as:
ORACLE_OWNER= oracle
ORACLE_OWNER= oracle
ORACLE_HOME= /usr/oracle/app/product/11.2.0/dbhome_1
Enter the full pathname of the local bin directory: [/usr/local/bin]: # Enter
Copying dbhome to /usr/local/bin ...
Copying oraenv to /usr/local/bin ...
Copying coraenv to /usr/local/bin ...
Creating /etc/oratab file...
Entries will be added to the /etc/oratab file as needed by
Database Configuration Assistant when a database is created
Finished running generic part of root.sh script.
Now product-specific root actions will be performed.
Finished product-specific root actions.
13.Installation completed. click 'close' button.

14. configure some setting for 'oracle' user.
[oracle@chetan~]#vi ~./bash_profile
[oracle@chetan~]#vi ~./bash_profile
# add at the last lone
export ORACLE_BASE=/usr/oracle/app
export ORACLE_SID= orcl
export ORACLE_HOME=/usr/oracle/app/oracle/product/11.2.0/dbhome_1/
export PATH=$PATH:$ORACLE_HOME/bin
export PATH=$PATH:$ORACLE_HOME/bin
[oracle@chetan ~]$ source ~/.bash_profile
[oracle@chetan ~]$ rm -rf tmp
[oracle@chetan ~]$ rm -rf tmp
[oracle@chetan ~]$ sqlplus / as sysdba
SQL>
Comments
Post a Comment